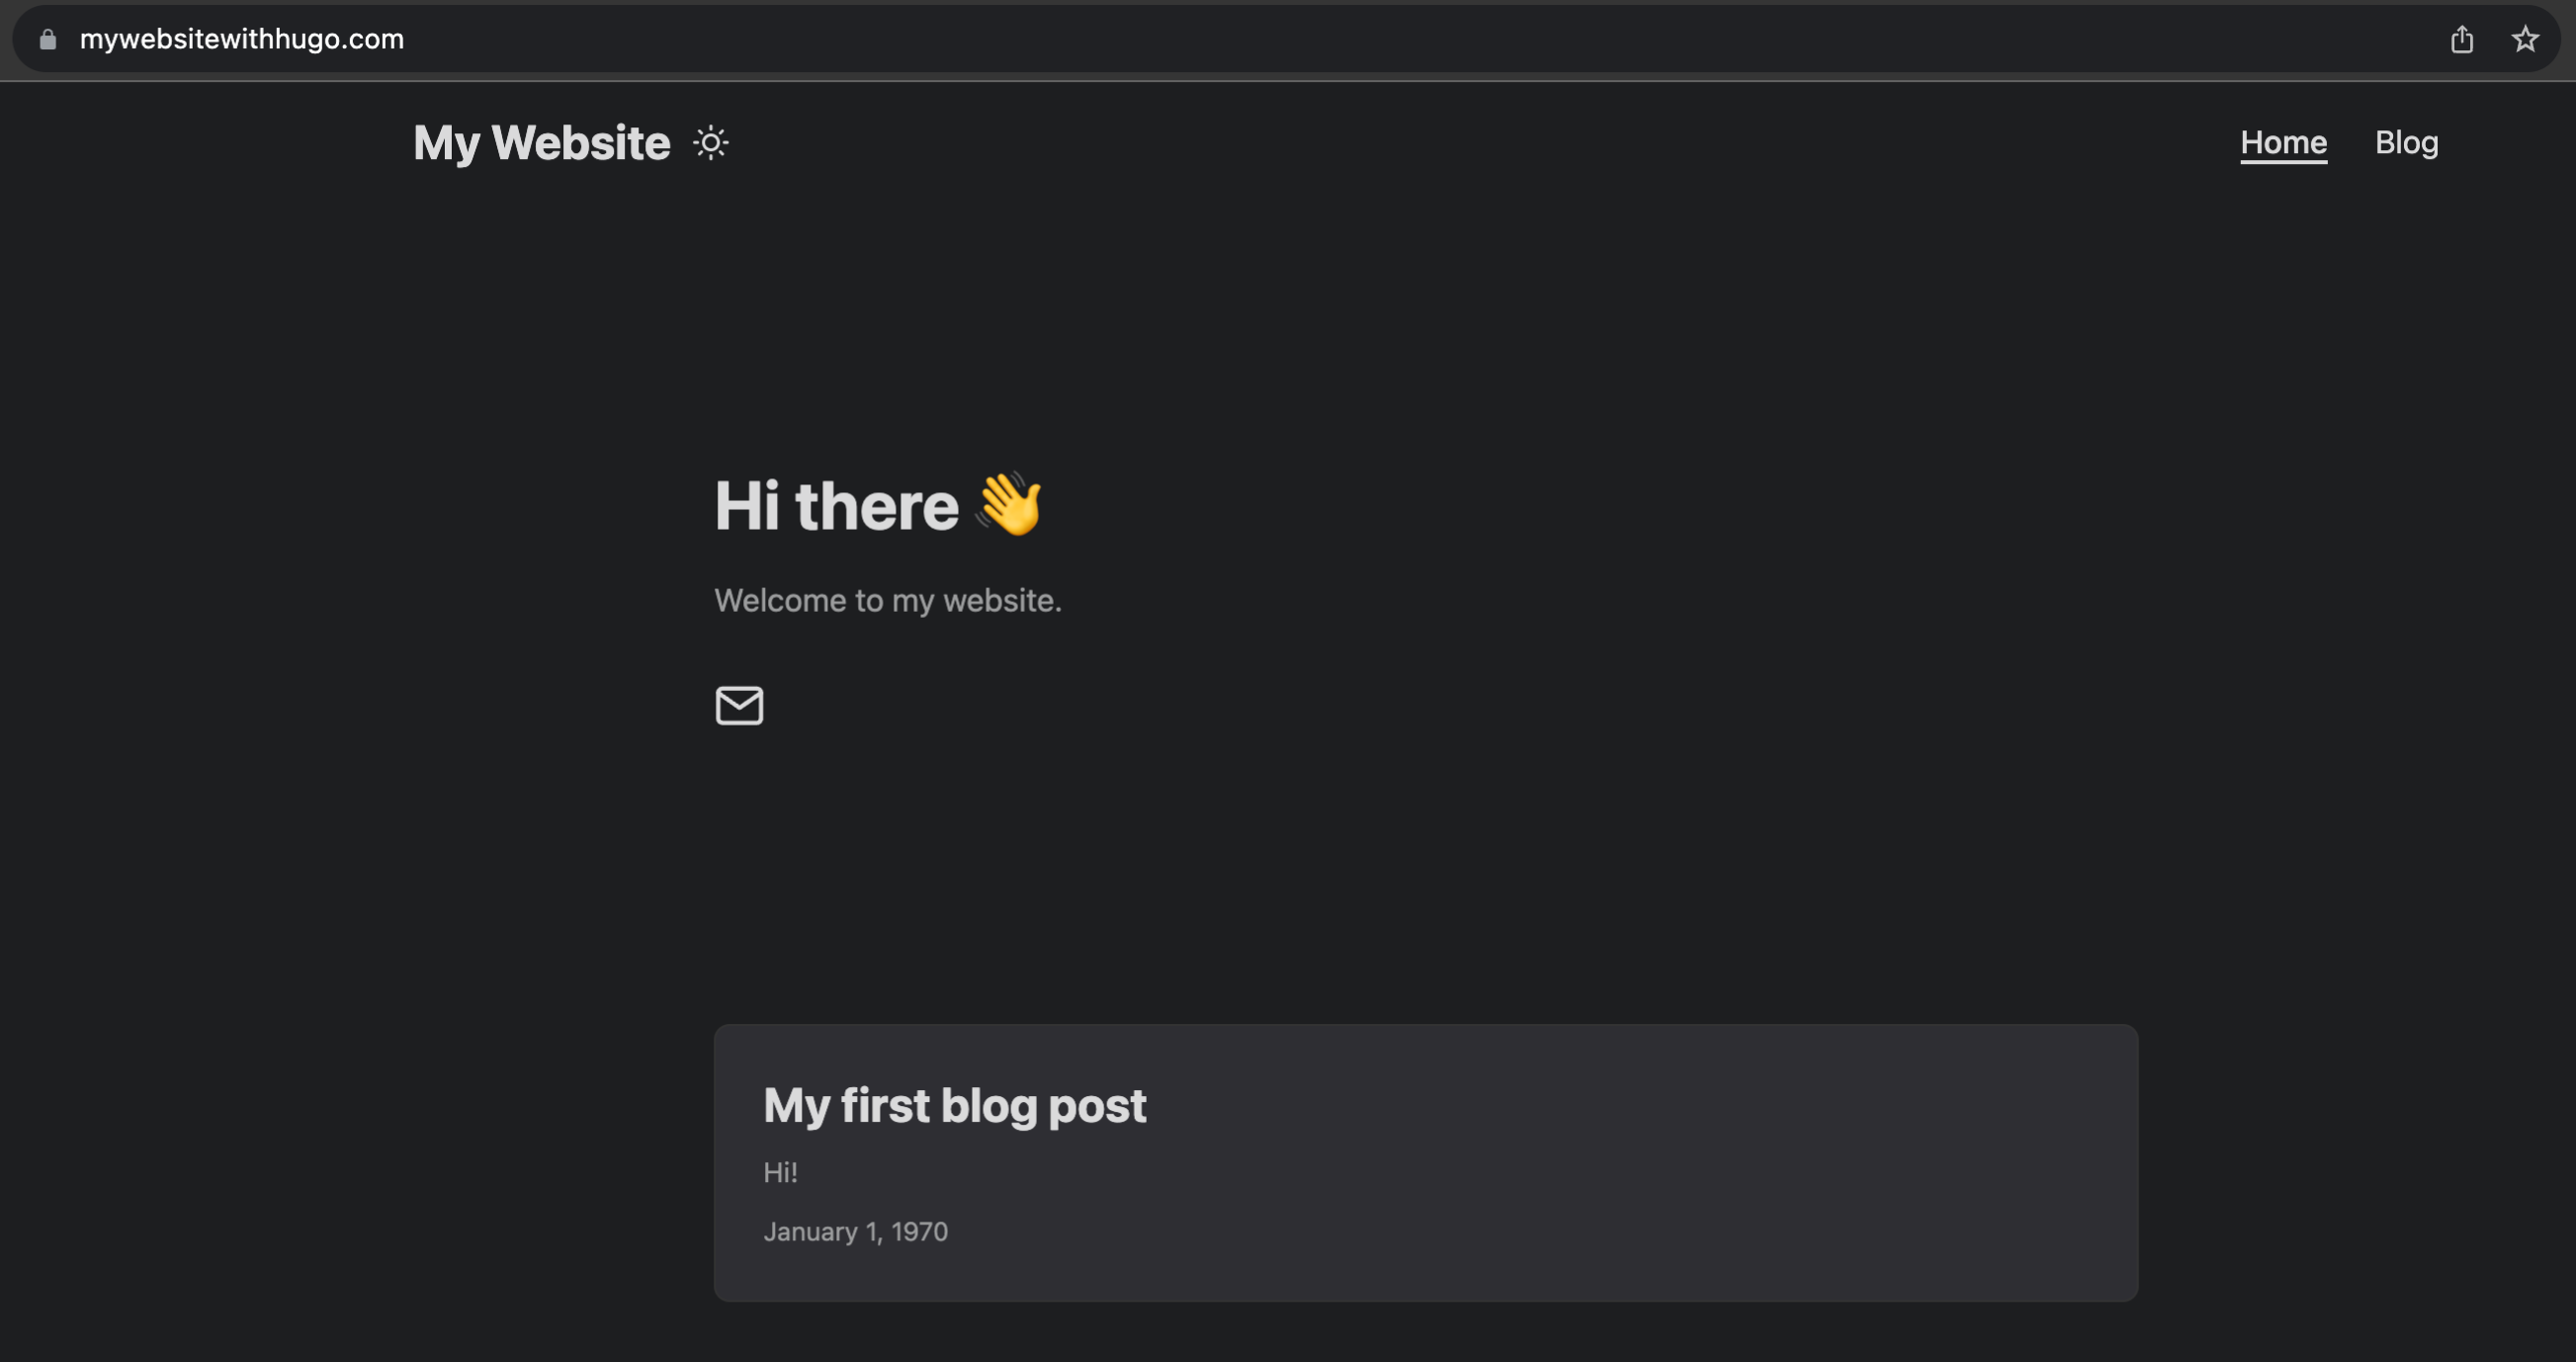
This blog post explains how to build and publish your own blog as a static website (like the current one you are looking at!) with a framework called Hugo and its PaperMod theme. We will host the website on GitLab Pages, and then register a domain on Squarespace, for a custom URL. The above image shows the end result of this tutorial.
In this tutorial I am using Homebrew, Z-shell and Visual Studio Code. You don’t necessarily need to use the same tools, though, to be able to follow along.
Step 1: Getting started with Hugo
As a start, we should install the Hugo framework. In case you have Homebrew already installed, you can run the following command in your terminal to install Hugo:
% brew install hugo
Installation instructions for other operating systems and package managers are described here on the Hugo website.
Once Hugo is installed, in your terminal, go to the directory you would like to store the contents of your website in. In my case this is the ~/Repos folder, so I use:
% cd ~/Repos
Remember:
- With
pwdyou can see your present working directory. - With
lsyou can list the folders and files in your directory. - With
cd <path>you can change the current present directory you are in. - With
mkdir <folder>you can create a new folder in your working directory.
Once you are in the right folder, launch a new Hugo website with the following command:
% hugo new site mywebsite --format "yaml"
(You can change mywebsite according to how you would like to call your folder.)
Change your present working directory to the mywebsite folder that was newly created and initialise a Git repository.
% cd mywebsite
% git init
Hugo offers a lot of themes that you can use to style your website. Have a look here to check them out. In this tutorial, we will use the PaperMod theme. This tutorial is easiest to follow along if you stick to the PaperMod theme as well.
To be able to use the PaperMod theme, we add PaperMod as a submodule to our GitHub repo and set it as our theme in the Hugo configuration file.
% git submodule add --depth=1 https://github.com/adityatelange/hugo-PaperMod.git themes/PaperMod
% echo "theme: PaperMod" >> hugo.yaml
We can now check out our new website! Run the following:
% hugo server
In your terminal output, you should be able to see an http:// address:
Web Server is available at http://localhost:xxx/ (bind address 127.0.0.1)
Press Ctrl+C to stop
Go to the http:// address to view your website. You will see something like:

Step 2: Configure your Hugo website
Add text to the homepage
You can use hugo.yaml to add text to your home page. Add the following code into the hugo.yaml file:
params:
  defaultTheme: dark
  homeInfoParams:
    Title: "Hi there \U0001F44B"
    Content: >-
      Welcome to my website.
  socialIcons:
    - name: email
      url: 'mailto:some@emailadres.com'
For the list of socialIcons available, check this page on the PaperMod repo.
Your home page should now look something like this:

You can also change the title on the top left by adjusting the value for title in hugo.yaml.
title: My Website

Adapt the footer
If you want to change the footer of your website, you can do this with the following steps:
- Create a new folder
partialsunder thelayoutsfolder in root foldermywebsite. - Add a new file called
footer.htmlunder thispartialsfolder. Now, any code put in this file will be used by Hugo instead of the specifications inthemes/PaperMod/layouts/partials/footer.html. - Paste the code in PaperMod’s
footer.htmlinto the newfooter.htmlfile and change the code responsible for the footer:
{{- if not (.Param "hideFooter") }}
<footer class="footer">
{{- if site.Copyright }}
<span>{{ site.Copyright | markdownify }}</span>
{{- else }}
<span>© {{ now.Year }} <a href="{{ "" | absLangURL }}">{{ site.Title }}</a></span>
{{- end }}
<span>
Powered by
<a href="https://gohugo.io/" rel="noopener noreferrer" target="_blank">Hugo</a> &
<a href="https://github.com/adityatelange/hugo-PaperMod/" rel="noopener" target="_blank">PaperMod</a>
</span>
</footer>
{{- end }}
Add a favicon
A favicon is a small icon displayed in the address bar of a browser to represent a web page. It is short for “favourite icon”.
If you want to add your own favicon to your website, you can do this in Hugo by putting the favicons in the static/assets folder. The static folder will be available from your root (mywebsite) folder. We should create an assets folder under static.
mkdir static/assets
In this example, we will use the “Growing Heart” emoji favicons from favicon.io. Downloading the (zipped) favicons will give you multiple versions of the favicon, with different sizes. Open the zip file and put the apple-touch-icon.png, favicon-16x16.png and favicon-32x32.png in the static/assets folder. Then paste the following lines in the hugo.yaml file:
assets:
  favicon16x16: /assets/favicon-16x16.png
  favicon32x32: /assets/favicon-32x32.png
  apple_touch_icon: /assets/apple-touch-icon.png
Also put the favicon.ico file in the static folder and paste the following line in the hugo.yaml file:
favicon: favicon.ico
Your VSCode environment will now look something like this:
![]()
When running hugo server, you will now be able to see your favicon:
![]()
Add a blog post
To add a blog post, put a Markdown file under the content/posts folder. Create a folder called posts under the content folder (which already exists in the root folder). Create a markdown file (e.g. blogpost.md) in this folder and paste the following content:
---
title: "My first blog post"
date: 1970-01-01
draft: false
ShowToc: true
---
Hi!
Your first blog post will now show up on your website!

Click on the grey box to go to the post.
title, date, draft, and ShowToc are all optional toggles. Removing these lines will still keep your blog post appearing on your website. title and date will, naturally, add a title and date to your post. If you use draft, it is important to set it to false if you want to see your post. Setting it to true will keep your post hidden. This can be useful when you are still working on a post and do not want to publish it yet. ShowToc will add a table of contents to your blog post. Any header (lines prefixed with #) will be added to this.
Create a menu
Paste the following in your hugo.yaml file:
menu:
  main:
  - identifier: home
    name: Home
    url: /
    weight: 10
  - identifier: posts
    name: Blog
    url: /posts/
    weight: 20
This will add a menu at the top right of your website.

weight determines the order in which the items appear in the menu. Using 10 and 20 instead of 1 and 2 gives you a little more wiggle room for later, in case you want to add new menu items, but do not want to change the weight for each item.
Step 3: Create a GitLab project
To publish our website to Gitlab Pages, we first need to create a GitLab account and create a new project on GitLab.
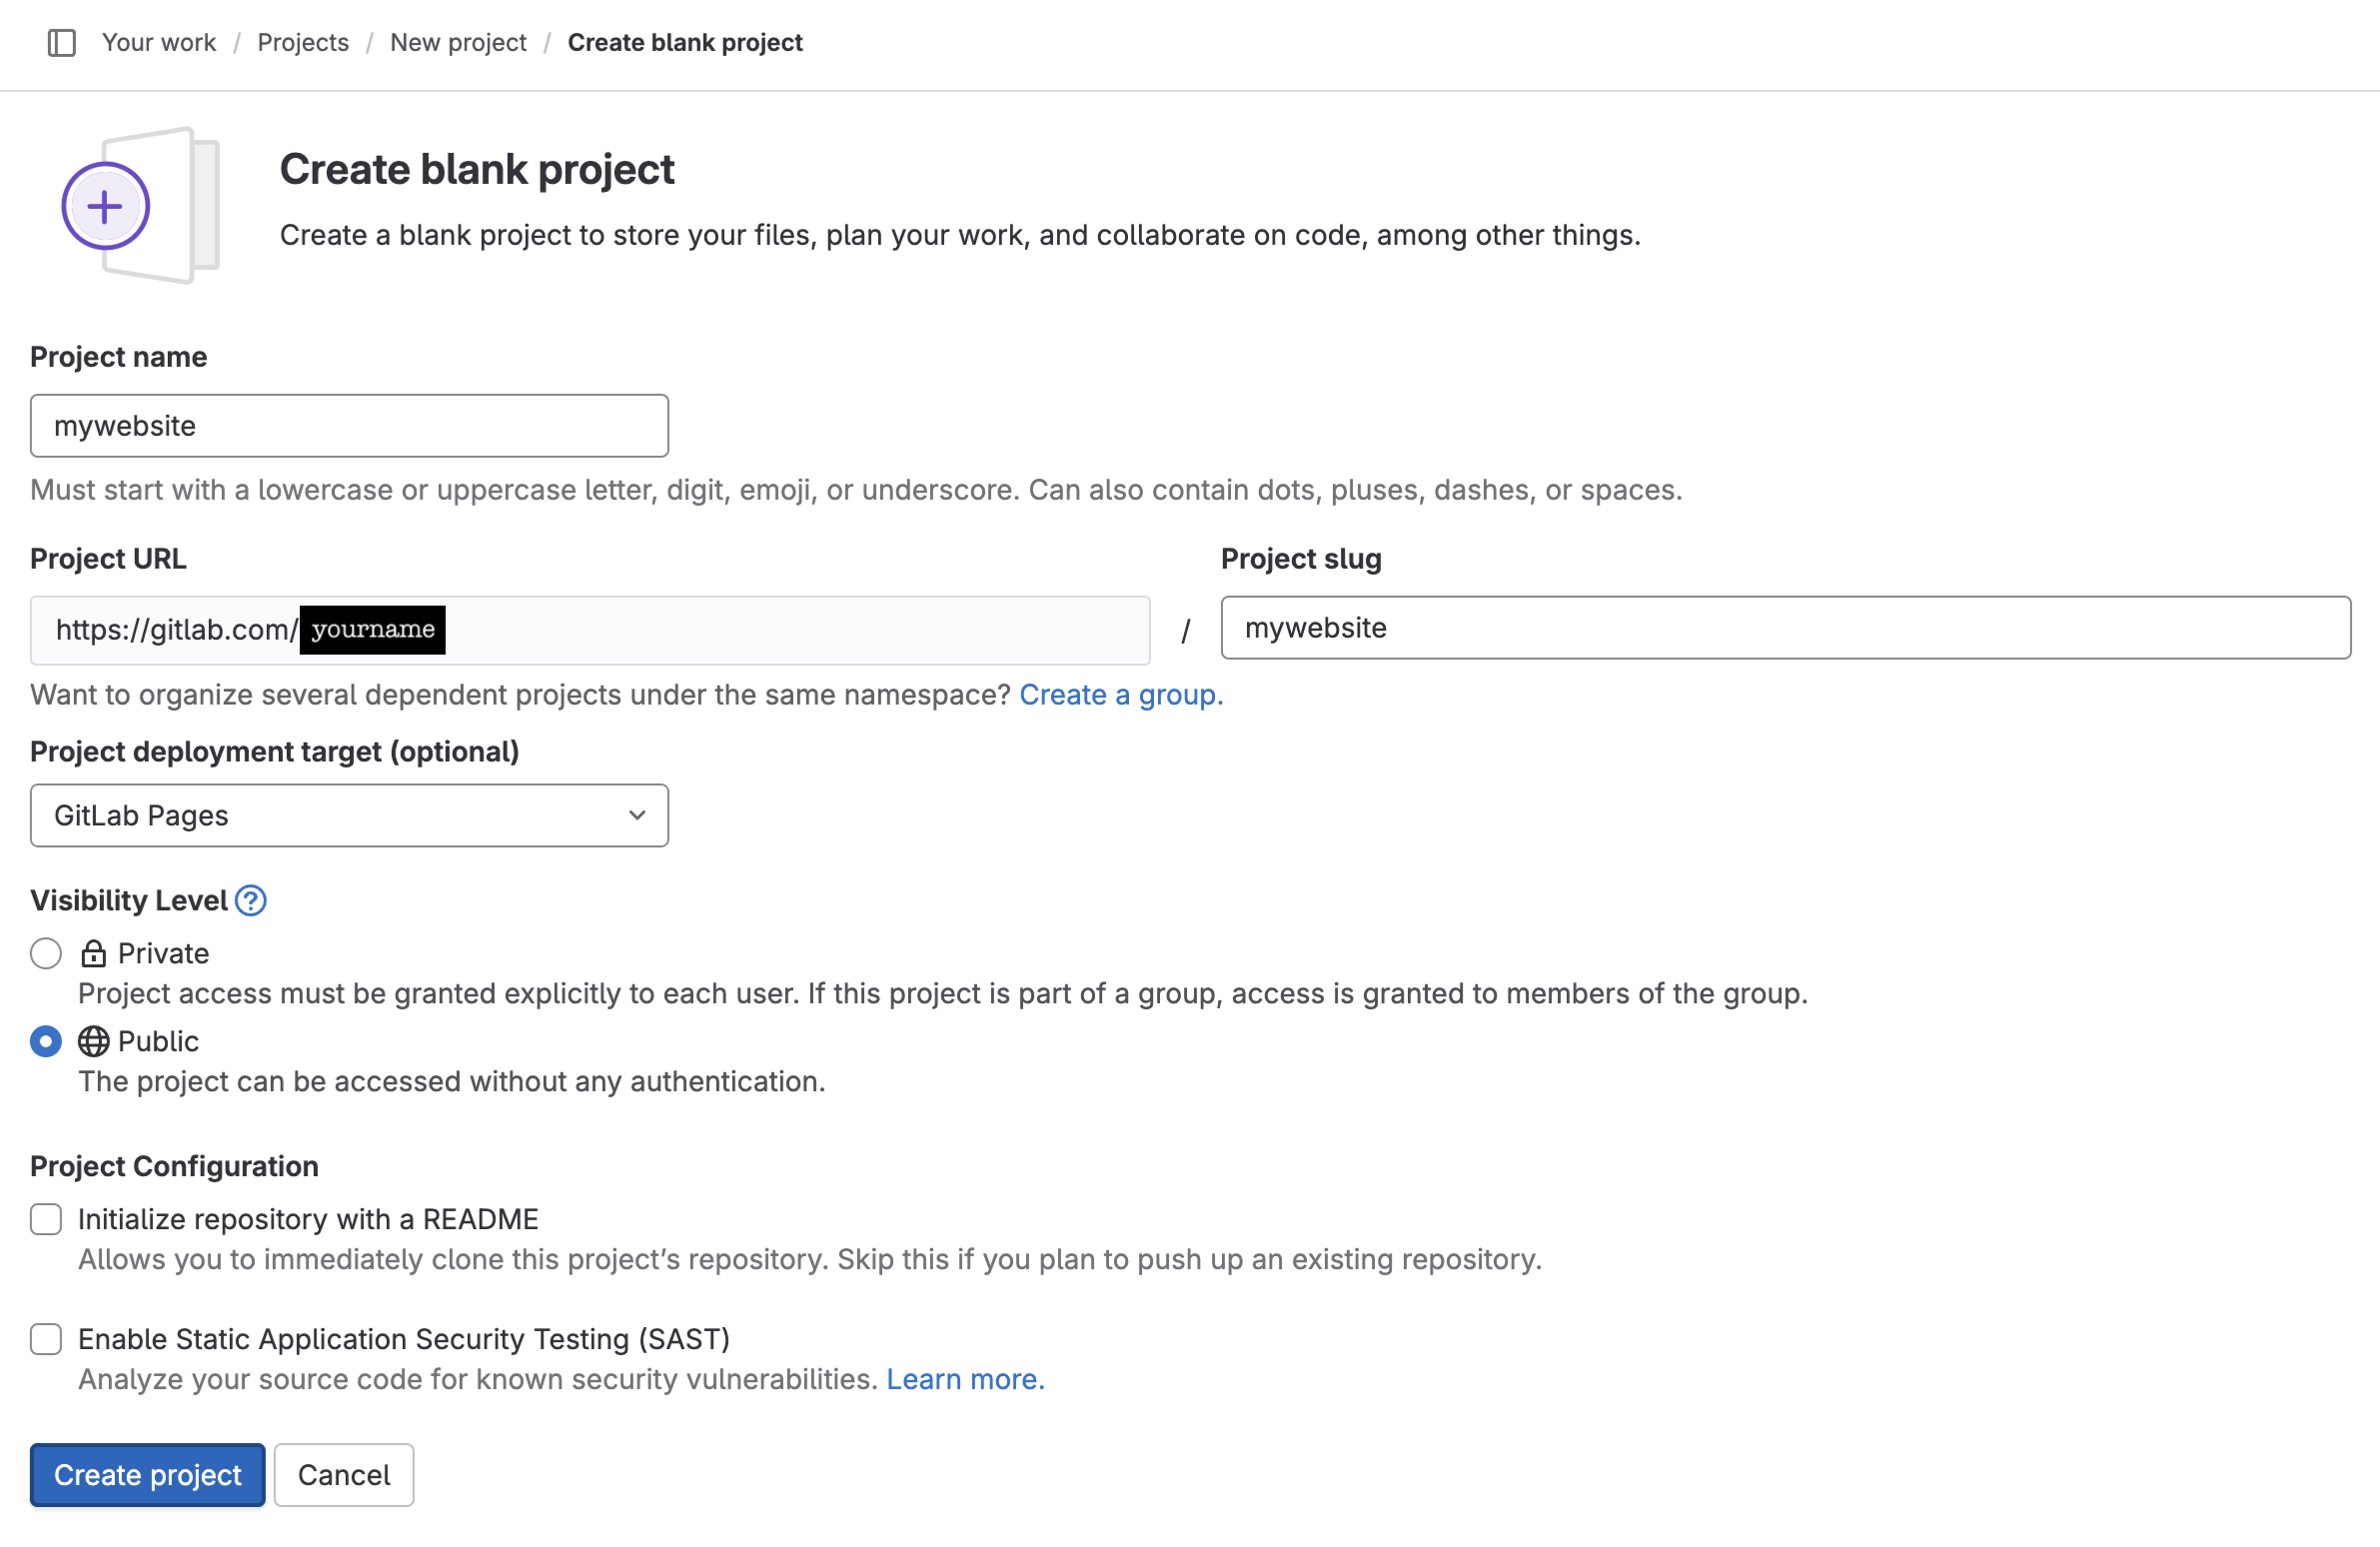
Once the project is created, run the following in your terminal:
git init --initial-branch=main
git remote add origin https://gitlab.com/yourname/mywebsite.git
git add .
git commit -m "Initial commit"
git push --set-upstream origin main
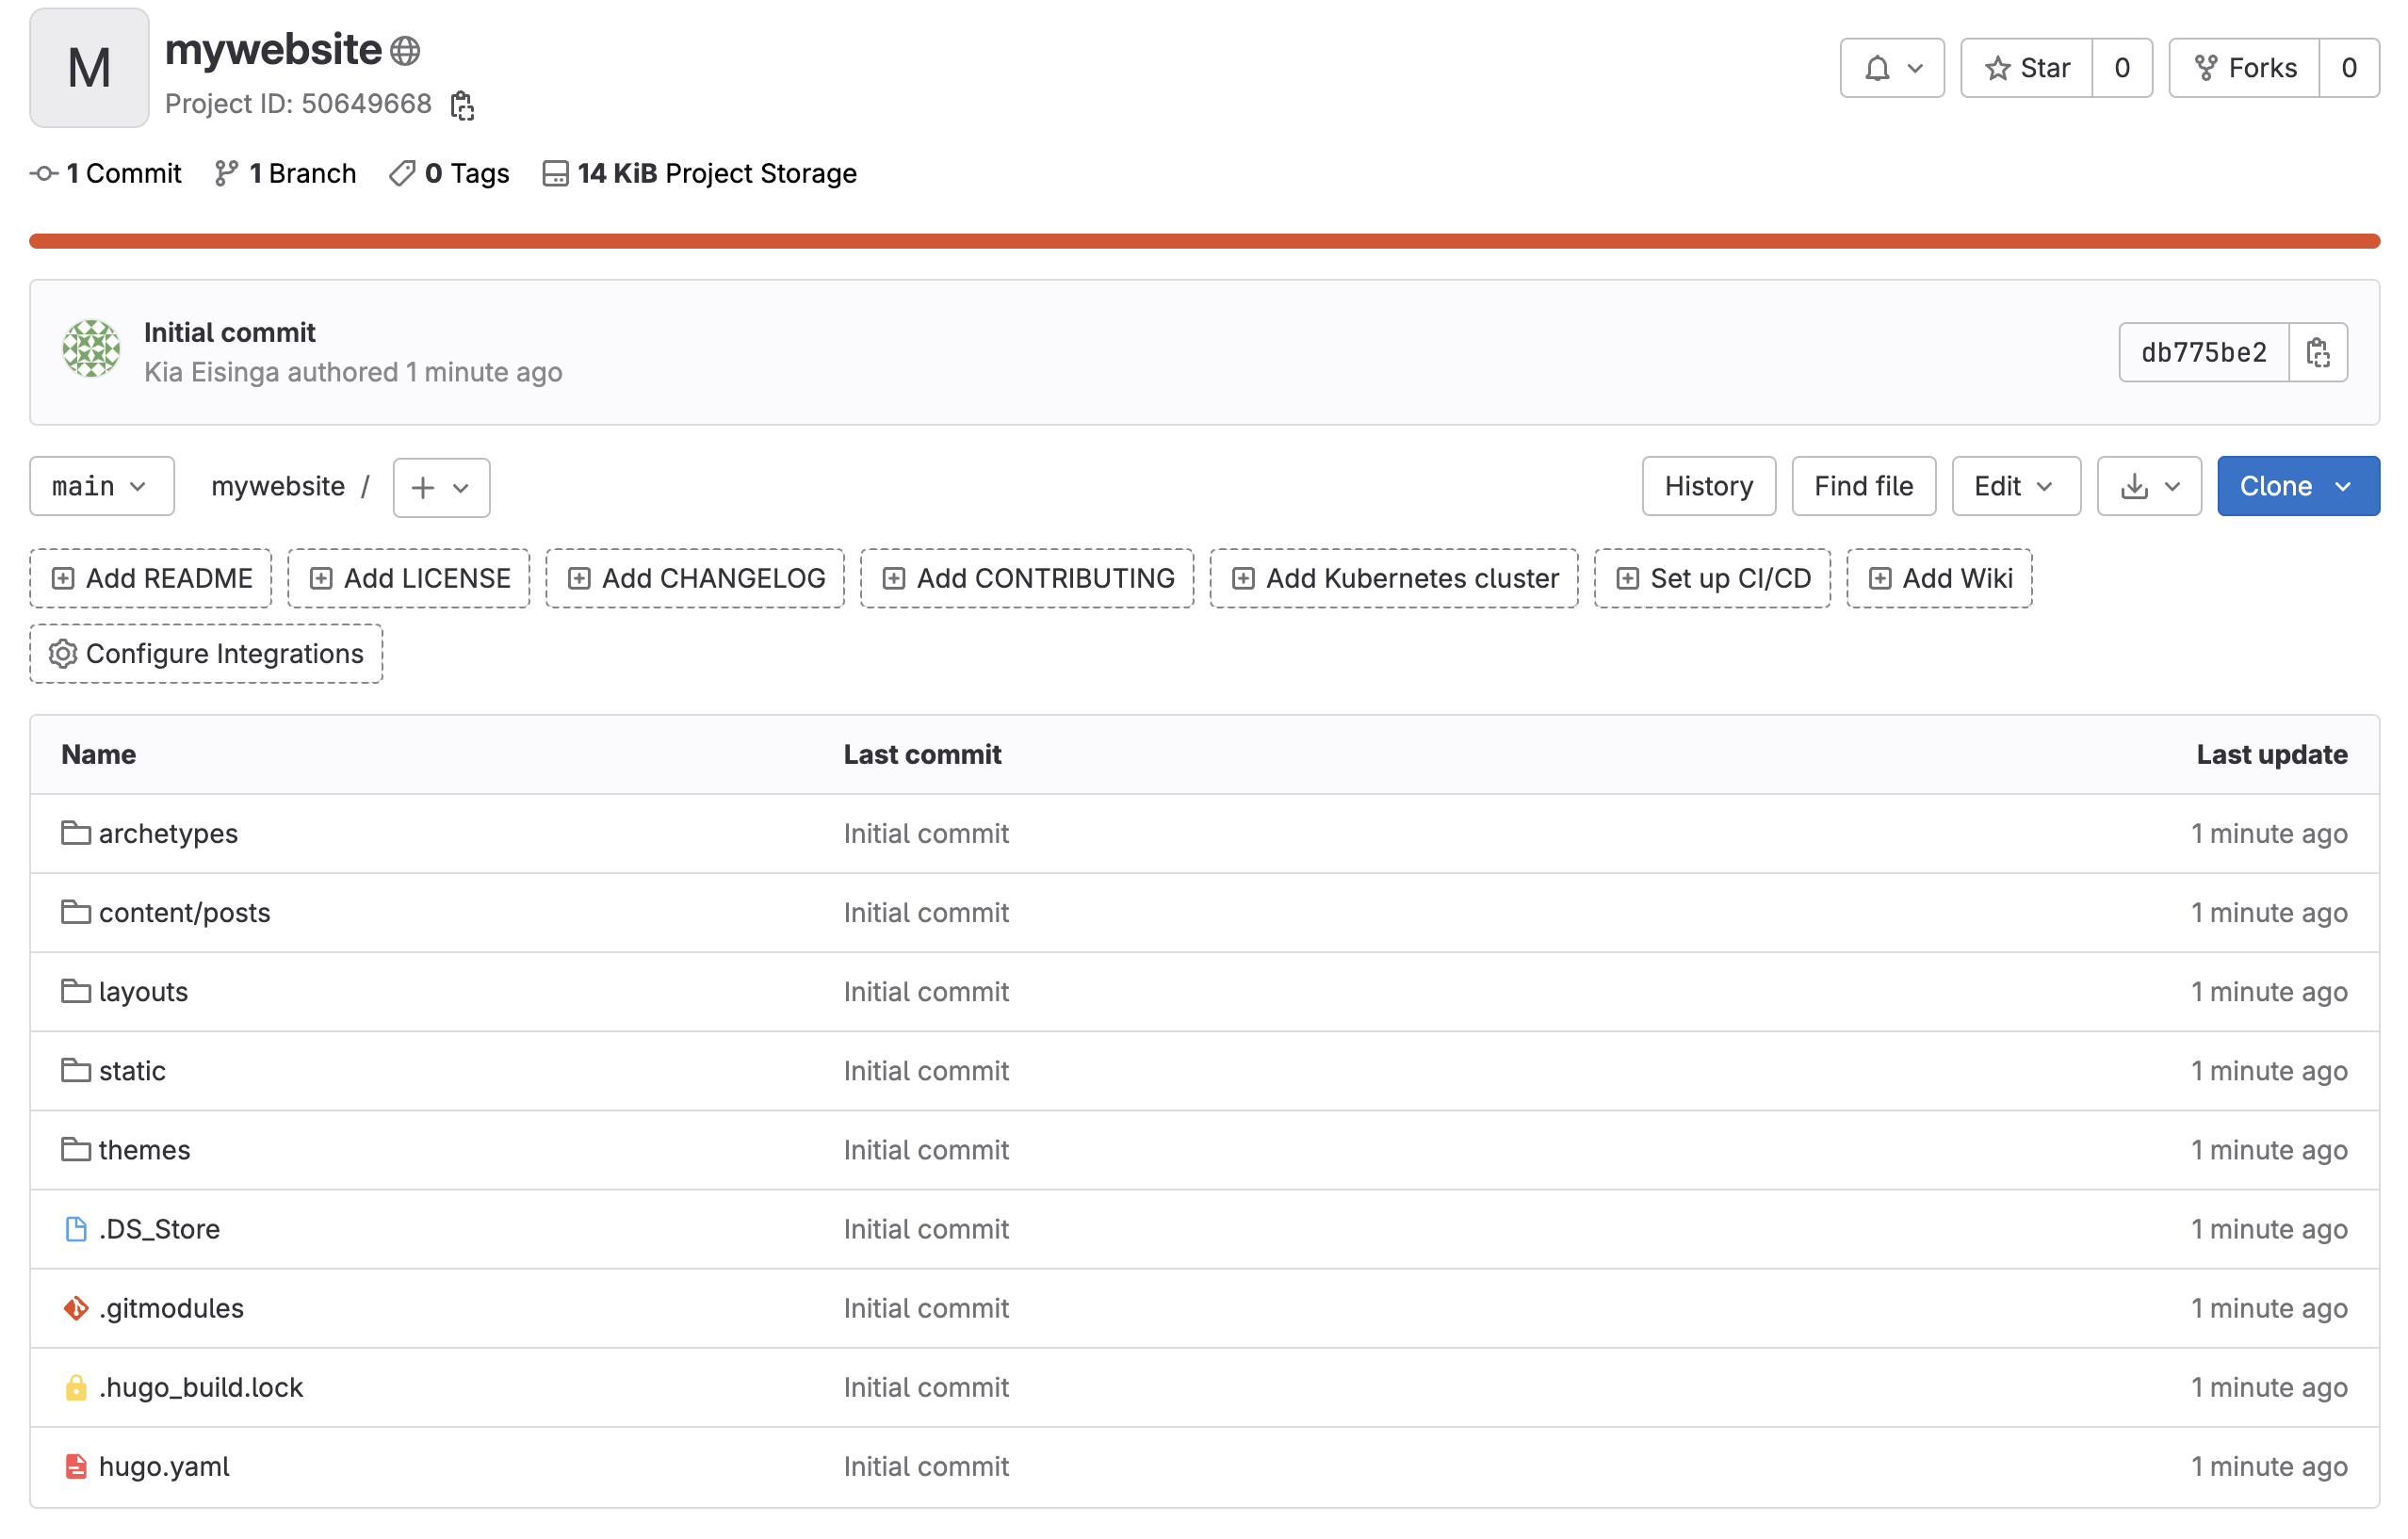
Replace yourname with your GitLab account name. Your files are now available in your GitLab project.
Step 4: Publish to GitLab Pages
To publish our project as a Hugo static website to GitLab pages, we need to use a CI (Continuous Integration) script.
Copy the following CI job from the Hugo documentation and paste it in a file called .gitlab-ci.yml in your root folder.
variables:
  DART_SASS_VERSION: 1.64.1
  HUGO_VERSION: 0.115.4
  NODE_VERSION: 20.x
  GIT_DEPTH: 0
  GIT_STRATEGY: clone
  GIT_SUBMODULE_STRATEGY: recursive
  TZ: America/Los_Angeles

image:
  name: golang:1.20.6-bookworm

pages:
  script:
    # Install brotli
    - apt-get update
    - apt-get install -y brotli
    # Install Dart Sass
    - curl -LJO https://github.com/sass/dart-sass/releases/download/${DART_SASS_VERSION}/dart-sass-${DART_SASS_VERSION}-linux-x64.tar.gz
    - tar -xf dart-sass-${DART_SASS_VERSION}-linux-x64.tar.gz
    - cp -r dart-sass/ /usr/local/bin
    - rm -rf dart-sass*
    - export PATH=/usr/local/bin/dart-sass:$PATH
    # Install Hugo
    - curl -LJO https://github.com/gohugoio/hugo/releases/download/v${HUGO_VERSION}/hugo_extended_${HUGO_VERSION}_linux-amd64.deb
    - apt-get install -y ./hugo_extended_${HUGO_VERSION}_linux-amd64.deb
    - rm hugo_extended_${HUGO_VERSION}_linux-amd64.deb
    # Install Node.js
    - curl -fsSL https://deb.nodesource.com/setup_${NODE_VERSION} | bash -
    - apt-get install -y nodejs
    # Install Node.js dependencies
    - "[[ -f package-lock.json || -f npm-shrinkwrap.json ]] && npm ci || true"
    # Build
    - hugo --gc --minify
    # Compress
    - find public -type f -regex '.*\.\(css\|html\|js\|txt\|xml\)$' -exec gzip -f -k {} \;
    - find public -type f -regex '.*\.\(css\|html\|js\|txt\|xml\)$' -exec brotli -f -k {} \;
  artifacts:
    paths:
      - public
  rules:
    - if: $CI_COMMIT_BRANCH == $CI_DEFAULT_BRANCH
This CI job will run every time you push changes to your GitLab project, and will publish your Hugo website to GitLab Pages.
Then, change and add the following settings in your hugo.yaml file:
baseURL: "https://yourname.gitlab.io/mywebsite/"
canonifyurls: true
relativeURLs: false
Push the new files to your GitLab project to publish your website:
git add .gitlab-ci.yml
git add hugo.yaml
git commit -m "add gitlab-ci script, update urls in hugo yaml"
git push
On the GitLab menu, go to Build, Pipelines. You will see that the CI job is now running.
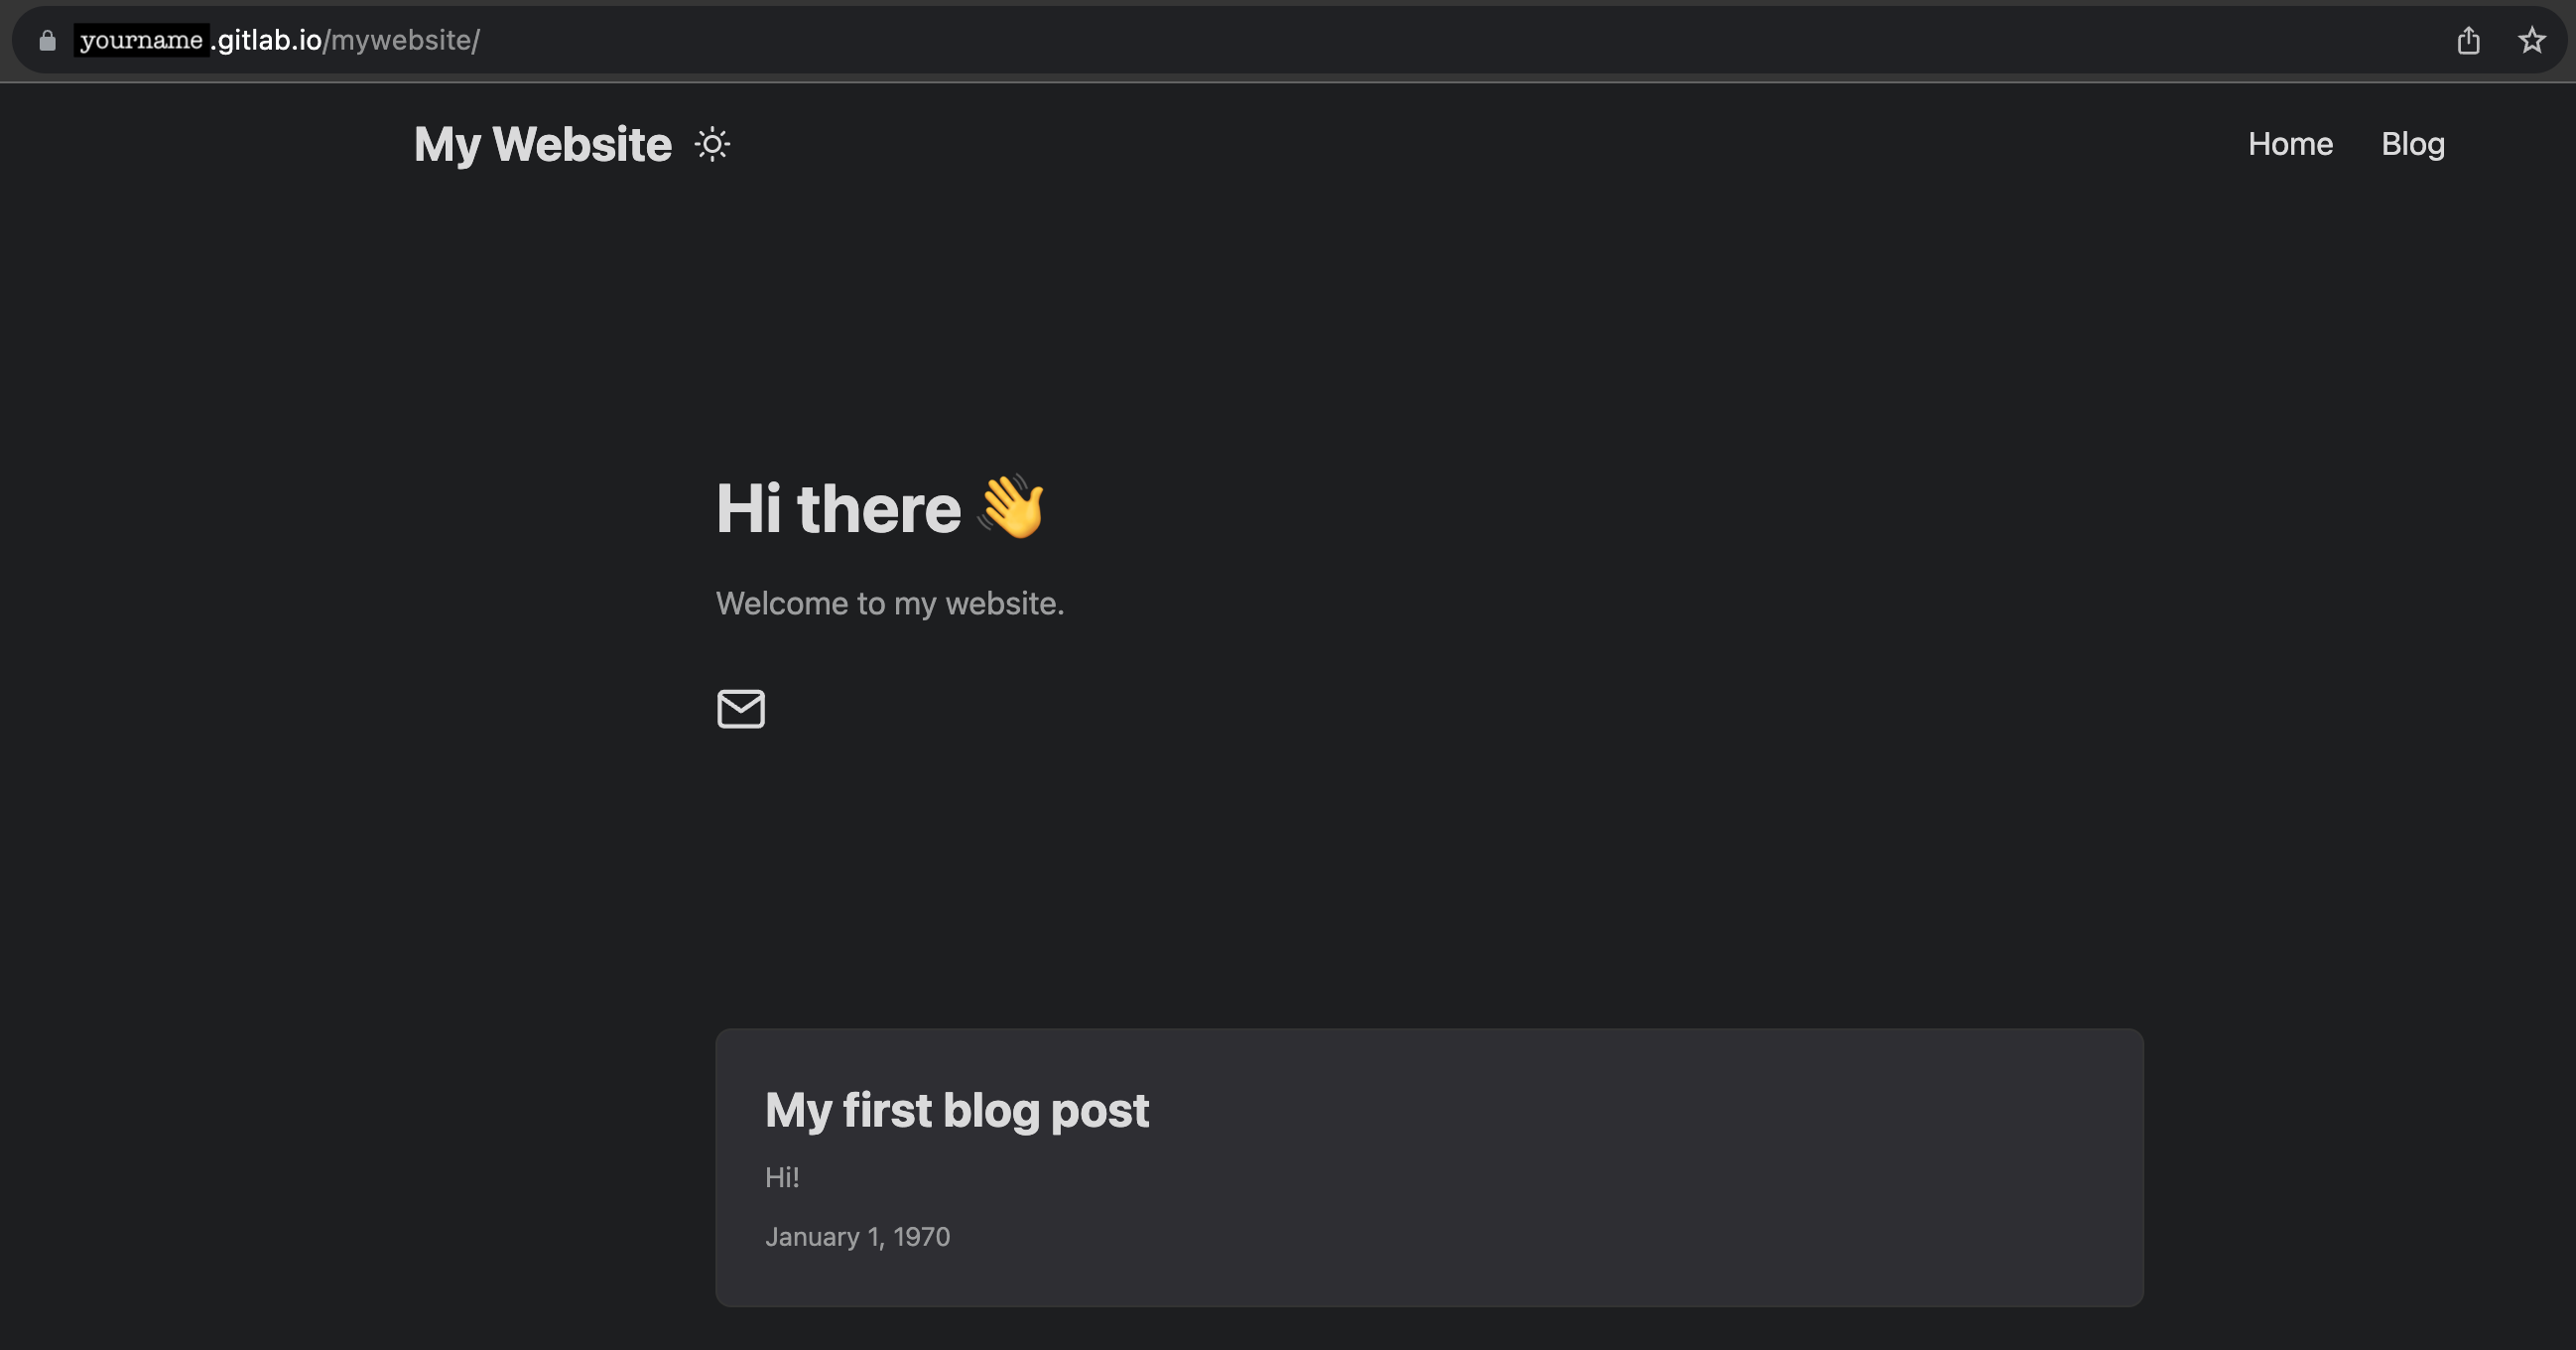
Once the pipeline has succeeded, you can find your new website at the following URL: https://yourname.gitlab.io/mywebsite/.
When you open the page, you can see that the URL changes to https://mywebsite-yourname-....gitlab.io. If you prefer to see https://yourname.gitlab.io/mywebsite/, you can change this from GitLab. Go to Deploy, Pages, and deselect “Use unique domain”. If it does not work for you right away, clear the cache from your browser or visit your page from another browser.
Step 5: Register and publish to a custom domain
In this example, we will register our custom domain at SquareSpace Domains.
Once your domain is registered, go to Deploy, Pages on your GitLab project and click on “New Domain”. Here, at “Domain”, enter your registered domain, e.g. mywebsitewithhugo.com. Click on “Create a New Domain”. You will land on a page like this:
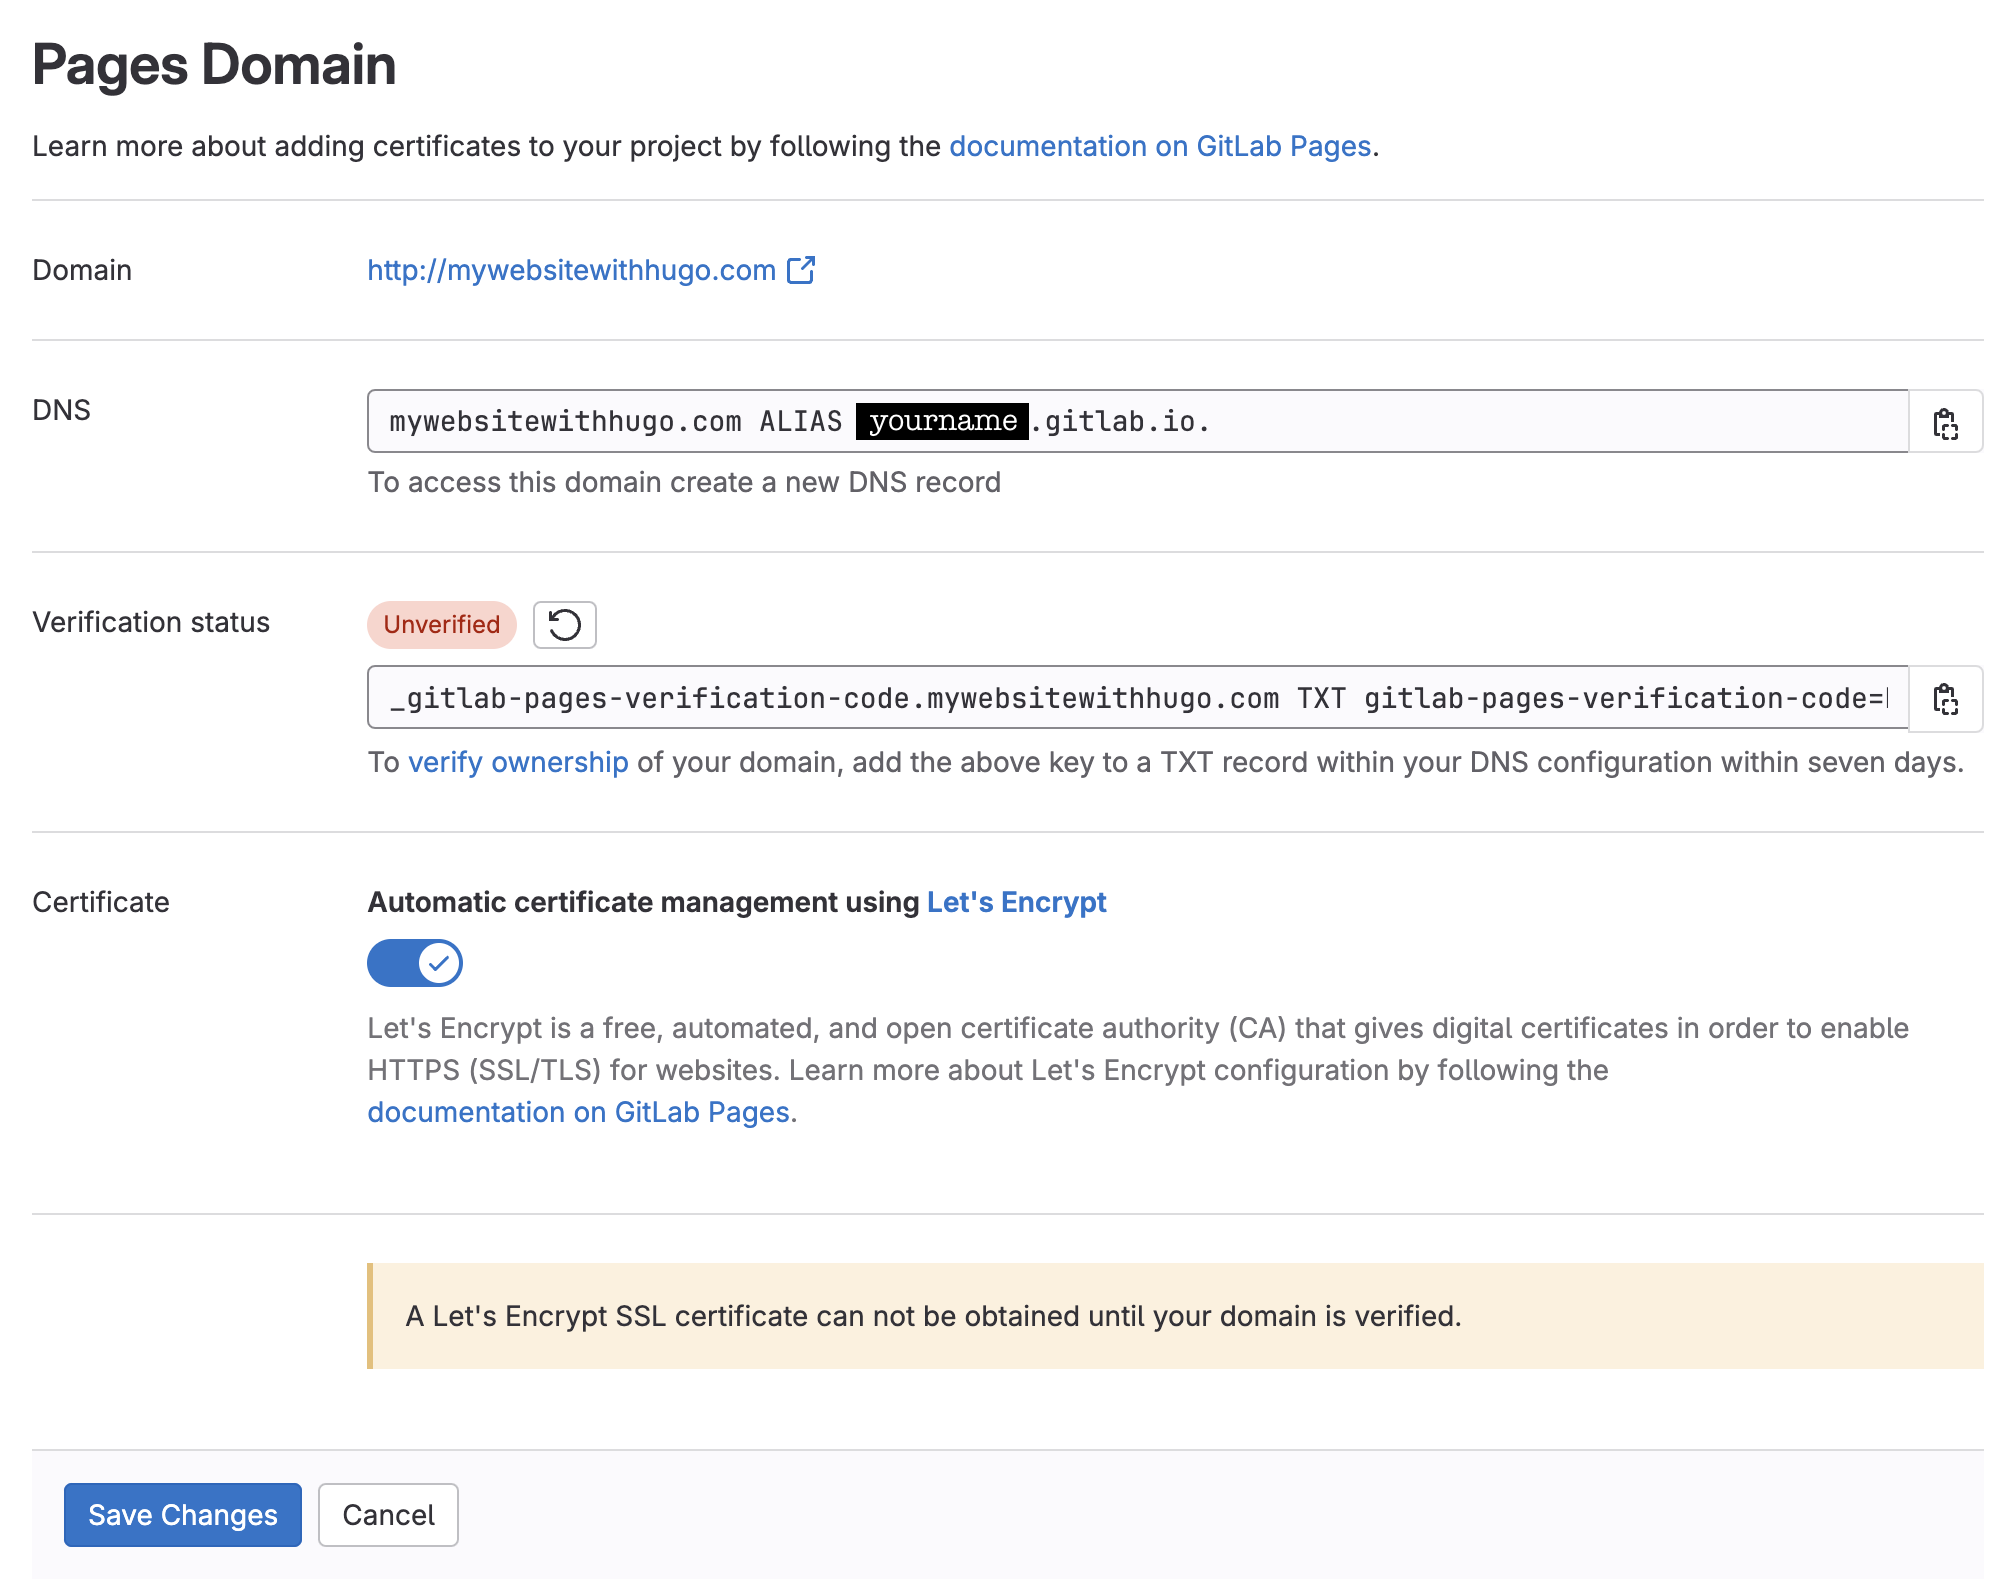
Go to https://account.squarespace.com/domains and click on your newly created domain. Go to Manage domain settings. Click on Edit DNS at the top right.

Remove the records under Squarespace Defaults. At the bottom right, click on “Add record”.
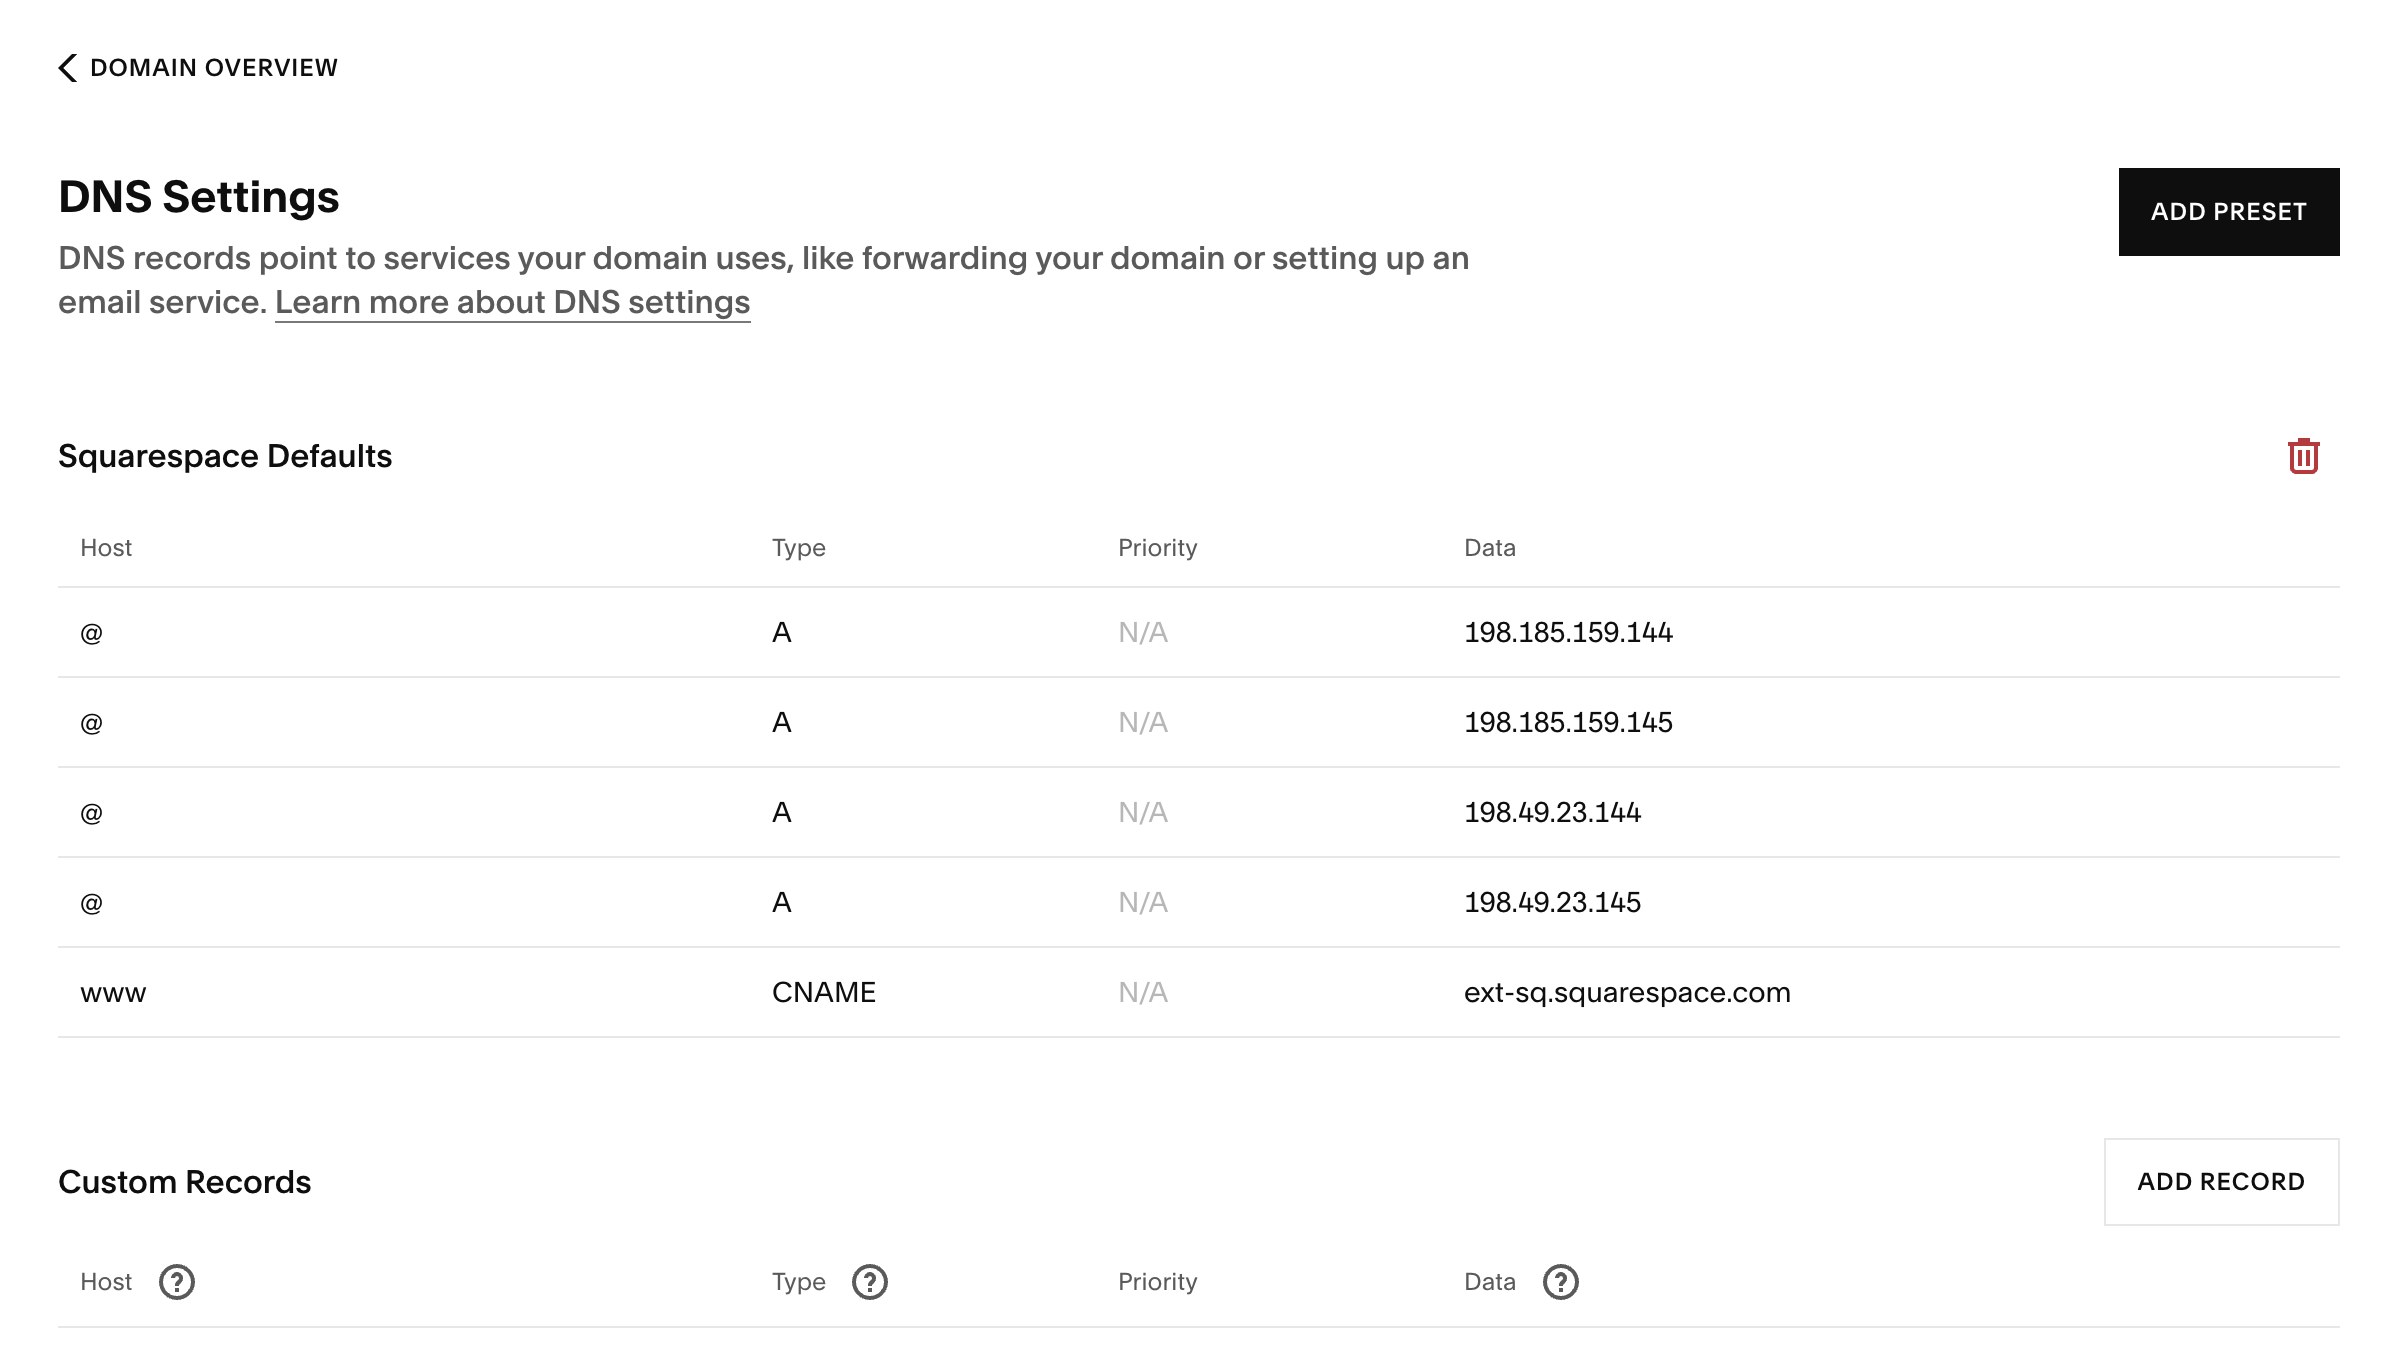
As a first record, enter @ under Host, “A” under Type, and 35.185.44.232 (pointing to the GitLab Pages server) under Data.
As the second record, enter _gitlab-pages-verification-code.mywebsitewithhugo.com under Host, “TXT” under Type, and gitlab-pages-verification-code=... under Data.
As a third record, enter @ under Host, “TXT” under Type, and gitlab-pages-verification-code=... under Data. Save the changes.
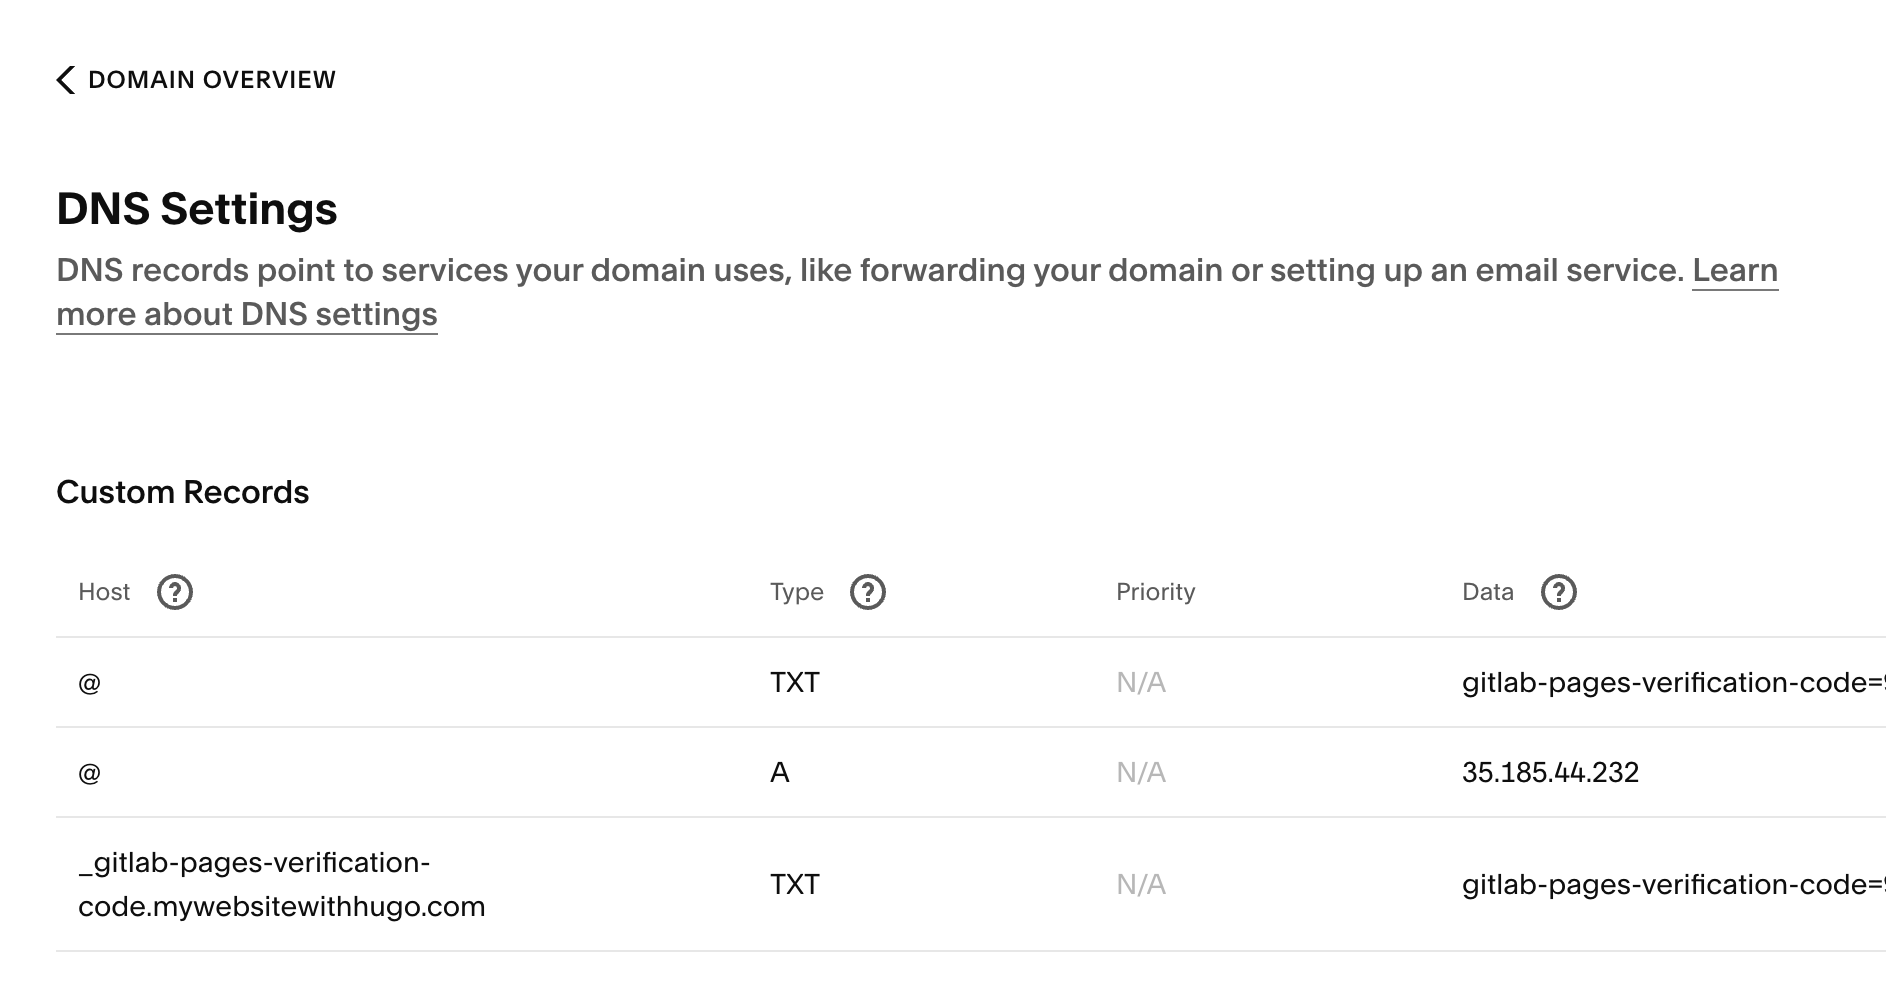
Note that these updates can take a while to propagate, so you will need some patience.
After some time, you should see your Hugo blog appear on your custom URL. You can then verify your domain on GitLab. Go to Deploy, Pages and click on Edit at your URL under “Domains”. Click on the refresh sign at “Verification status”.

Update the hugo.yaml file with baseURL: "https://mywebsitewithhugo.com" and push your changes.
Your Hugo blog is now available under your custom URL! 🎉

Happy blogging 😉!
Links
- As an example, you can have a look at my repository for this blog.
- End result of this blog can be viewed at https://mywebsitewithhugo.com.